October 29, 2012

PVC Baby Floor Entertainer (CRAFT)


This craft is from and done by my friend, since I am currently 9 months pregnant with 2 little kiddos I have not been able to get the crafting done that I would have liked to!

I saw this PVC baby floor entertainer at my friend's house and thought it was soooo awesome! What a great idea to make one of these! I myself have already had two kids and never bought a floor play activity center because I never wanted to spend the money on it... and we were fine without it! BUT if I can make it and not spend all that money that the stores cost you, and you can put whatever toys on it that you want, and spray paint it any color you want... AWESOME!

PVC is quite simple to make, just go to Home Depot or Lowes and pick out how long you want each straight bar (Cut it yourself with a PVC pipe cutter or ask if someone there can cut it for you), and also the elbows (curved ones), and T ones to connect the straight bars, and buy some end caps and there you have it!

If anyone wants a more specific list, let me know!

October 22, 2012

Halloween Decorations for super cheap! (CRAFT)


So, this post is also from and done by my friend! Again, I am about to have my baby and not really been able to craft much! BUT I saw this at her house and asked her to take some pics for me!

1) The top picture is sooo cool! It hangs above their entertainment center and TV. Grab a dead branch from your tree, or a neighbors (ask first). Use string to tie onto the branch and hang to the ceiling. Cut out shapes of bats, or ghosts or pumpkins if you wish, out of black cardstock, bend to make more lively and use the string to tie to the branch, using different heights for more appeal. The great thing about this... you can keep the branch up year round if you want and add hearts at valentine's day, candy canes and ornaments or snowflakes at christmas, etc.

You only pay for the black cardstock, and string, IF you don't already have it. If you already have it then FREE!

2) Paper plates can be cut out to say "BOO" and use that same black cardstock you got before and make circles and make it look like eyes!

If you already have the paper places then FREE!

3) R.I.P. gravestones! These are made from Baby Diaper Cardboard boxes! Cut into the shape of a gravestone! Paint it Gray, or you could also use duct tape if you already had that. Use a black sharpie marker to write R.I.P. and also someone's name underneath and maybe even a year and saying if you want. My friend and her hubby were very clever in coming up with funny names! HA - I will blame the pregnancy brain, but it took me a minute or two before I got the joke... I thought it was someone's name I was supposed to know. "Kim O. Toedraggin" and "Constance Noring"!

FREE, unless you don't have gray paint or duct tape, or a marker!

October 12, 2012

Giveaway Contest Winner

Congratulations to Vivien Wade Van Leeuwen! You are the winner of our necktie giveaway! Please message me with size and contact info!
 
Did you miss the necktie giveaway???

Check out our FACEBOOK PAGE for updates, discounts, and giveaways that will be coming up!
Stefanie

October 10, 2012

NECKTIE GIVEAWAY - ending soon

TOMORROW is the LAST DAY to enter the free necktie giveaway! If you have already entered you can enter AGAIN and get more of a chance to win!
1) "Like" our facebook page
2) "Share" the photo (same as below) from our facebook page.
3) "Comment" on the photo as "Shared"

Winner will be picked at random (using a random number generator) on Friday October 12th at 8:00 AM

Winner will receive a "Fall Harvest Polka Dot" necktie ANY SIZE (Baby to Men's sizes)


October 1, 2012

Toddler Magnetic Travel Tray


When we went on our super long road trip this summer I wanted as many activities to entertain the kids as possible. One of the ideas was a magnetic travel tray. I bought $1 small cookie sheets from the dollar store, that fit on their laps. I bought magnetic clips to hold their drawings and papers, and wanted to let them color, but that never sounds like a good idea when in the car, to give your children lots of objects that easily fall off and make messes... so I bought a $1 first aid kit (walmart) and added stick on magnets to the back and emptied out the bandaids and first aid items (kept them for use, so you really get more use out of your money spent). Add the crayons to the box and you are all ready to go with ALMOST no spills, as much as one can with toddlers and kids!
The great thing about this... you can use the crayon magnetic box to hold lots of other objects as well... like magnets for example. There are soooo many uses for this tray...
Magnetic Paper Doll
Drawing/Coloring
Magnetic Puzzles
Chalkboard (just spray paint the board with chalkboard spray paint)
Food Tray (Help to keep food on their laps and easier to eat if you are on a road trip and don't want to take time to stop to eat. I suggest when on a long road trip to make those stops at eating times but just to let the kids play and get energy out, then let them eat in the car and make the time go by faster in the car!)
Other Magnetic Games (Possibilities are endless)


See look... no messes made when moved around!

September 29, 2012

Gift Certificates NOW available!


Gift certificates are now available on the etsy shop... www.reachinghyer.etsy.com and can be used for custom orders (more products coming soon)!

September 28, 2012

NEW PRODUCT & GIVEAWAY: Fall Polka Dot Necktie

Check out our new "Fall Polka Dot" Neckties!
$16 in our Etsy Shop

We are starting off our tie collection with the "Fall Polka Dot" necktie, and will have more options available soon, so check back!

We are so excited that we are giving away a FREE necktie (Any size) by October 12th! Check out the details on one of the pictures below!
see our FACEBOOK PAGE


Size neckties available:
Baby Onesie Tie: Iron-On Ready (Onesie not included)
Baby Tie: 6-12 months
Toddler Tie: 1-2 years (Normal & Pretied Available)
Lil Boy Tie: 2-4 years (Normal & Pretied Available)
Bib Boy Tie: 4-6 years (Normal & Pretied Available)
Lil Kid Tie: 6-8 years (Normal & Pretied Available)
Big Kid Tie: 8-10 years (Normal & Pretied Available)
Lil Man Tie: 10-14 years (Normal Available)
Men's Tie: 14 to Adult (Normal Available)


CUSTOM ORDERS ALSO AVAILABLE - You choose the fabric, we make the tie!
Click on the "Custom Order" tab, or send me a message with the details!

September 24, 2012

Pillow Case Toddler Travel Bed

I made these for my two kids this summer since we went on a long road trip to visit family! They worked great!! And my kids slept great!!

1 - Buy 4 pillows (Walmart $2.00 each), Buy 4 pillow cases (Walmart $1.00 each). Total cost = $12.00 if you don't have any pillows or pillow cases! If you already have those items then cost = FREE!

2 - Sew the pillow cases long lengths together.

3 - Insert the pillows into the pillow cases. (I did not sew them shut because it is easier to take them out and put them into normal cases if you want to, or to clean them)

4 - When it is time to sleep, just fold one pillow under so the head is up higher. Even doing this there should be plenty of room for your toddler child! Testing it out in the picture above is my 3 year old and he had plenty of room!

September 17, 2012

Sparkle Your Keys


Every time I go to get a copy of our keys I always want those those keys that look so cute and decorated! BUT I can never get myself to spend more money than what I have to on them (me=cheap). So.... I decided to sparkley my cheap keys with my nail polish!

1. I had to use a couple of coats of the nailpolish and sparkles to get it the color I wanted

2. Then I topped it with a clear coat of nail polish.

3. LET IT DRY... as long as you can! I myself did not let it dry as long as I could have and put it on my key ring which scraped it up a bit... but it still looks pretty good! I love the added sparkle!

September 11, 2012

Hair Tutorial: Big Curls with NO hair rollers


Here is a quick (Less than 10 minutes) way of curling your hair with BIG CURLS withOUT using hair rollers, but with the same idea!

Let me know if there is a hairstyle or look you want to get but are not sure how!


September 10, 2012

Growth Chart - That Folds Down


I wanted to make a growth chart for my kids... BUT I didn't want a wooden one at first because we will be moving alot (Air Force) and a huge long wooden board just sounds hard to move and awkward to place. so... here is what I came up with:

1 - Go to home depot (or another place) and get a 7 foot wood board piece. Try to get the nicer wood with not as many cracks and holes since you will be displaying it and not just making something with it. If you will be making it like I did (foldable), then have someone at home depot cut the wood piece in half for you.

2 - Buy 2 hinges (for the back of the wood so it can bend) and also 2 pieces of hardware to hang the wood piece up on your wall.

3 - On the back of the wood piece, at the top, screw in the hardware to hang the wood piece up on your wall.

4 - Put the two wood pieces together. On the back screw in the hinges so that the two wood pieces are connected as closely as possibly (touching) and when you fold the board down it closes in the direction you want it to close.

5 - Paint the wood piece.

6 - Cut out the numbers (1-7) and wording that you want (I put "Growing Up Hyer" since our last name is Hyer), and the lines to mark feet and inches. You could also just stencil or paint. I used my cricut to cut this out.

7 - Use Mod Podge or glue, to paste everything where you want it on the board. Mod Podge the whole thing to give it a polished finished look.

8 - Measure 1 foot from the floor (since you are starting with the 1 foot number) and hang up your growth chart! Use permanant markers to mark the date and name of the child's height!

September 2, 2012

I Spy kid's Activity

 
My mother-in-law had made and sent this to my boys.

1 - Find a jar (preferably a plastic or one that won't brake)

2 - Fill half full with rice or beans or air soft gun pellets (like my mother-in-law did)

3 - Add small toys and knick knacks. You can use small button and button shapes found at craft stores, or small toys or even find these at Goodwill or thrift stores in small bags already an assortment.

4 - Hot Glue the lid shut so it won't make a mess!

5 - You can either play WITH your kids by asking them to find certain objects by naming them, or find an object that starts with a letter or sound, or have them tell YOU what they see! You can also make an ISPY card. To do that either find pictures of the items online and put on a Word Document and print (also can laminate and use wet erase markers for reuse!) and have them find the objects and mark them off when they have found it. Or you can take your own pictures of the actual items in the jar BEFORE you hot glue the lid shut!

August 16, 2012

PVC Toddler Chair


I am so glad that I made these! I have been wanting toddler table and chairs for FOREVER! BUT I am pretty cheap I guess and could never get myself to spend all that money on kid's table and chairs... the cost always just seemed too high. BUT this past weekend I bought that table you see for $11 at Target (On sale, but normally I think only $14 or $15! And NO, it actually is NOT a toddler or child table... it is a side table, but at the perfect height for a kid table! There is a side table at IKEA for a good price as well, but unfortunately we currently don't have one near by and haven't driven recently to a city that has one!

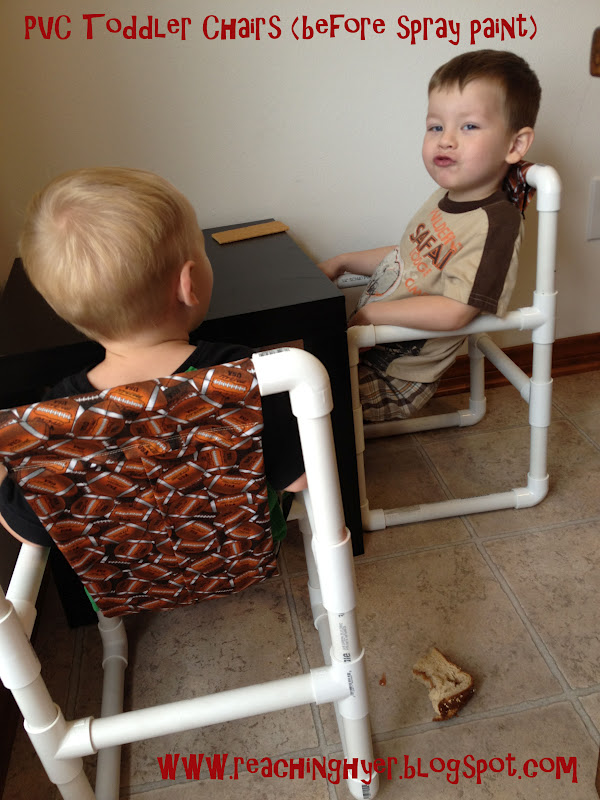
Next I had to think about chairs... my boys were so excited to have a table, but they couldn't use it because we had no chairs! So, I got to experience my first PVC pipe project! My boys were so excited to pick out the football fabric and also help me put their table and chairs together! What a fun project to do together!

MATERIALS needed for ONE toddler PVC pipe chair:

- One 10' PVC pipe 3/4" ($2.18) - buy the stronger kind. Have someone at Home Depot cut the pieces for you, or take it home to cut it yourself. Cut 7 pieces at 10", 2 pieces at 6", 4 pieces at 4", and 4 pieces at 5"
- 8 elbow pieces 3/4" ($0.47 each, total $3.76)
- 6 tee shaped pieces 3/4" ($0.47 each, total $2.82)
- One piece of fabric cut 29.5" x 17.5". Fold hot dog style so you see WRONG side of fabric and sew along the one long edge so the front and back are sewn together (1/2" seams). Iron so the part you just sewed is centered. Sew along ONE smaller edge. Turn inside out. Fold smaller edges down toward back side 3" and sew TWO times so there is more wear and tear! You are done! Make the edge that you sewed before turning inside out (the more finished side) be put at the top of the chair since that is what people can see.
- Black Spray Paint ($3.48)

TOTAL price for ONE toddler PVC Pipe Chair: $8.76 if you already have cloth and spray paint, or don't want to spray paint it! If you have absolutely nothing then $12.24 PLUS the cost of whatever material you choose!

If you choose NOT to spray paint it, OR choose to spray paint it a lighter color then here is a tip: you can use ACETONE to remove the black wording from the PVC pipe!


Putting the chair together is actually pretty simple! Just by looking at the pictures above you can see where the elbow fits to the 10" piece and so forth. Basically for the BACK of the chair you will have the 10" long piece on top with the elbow pieces connecting it to the sides. Then along the sides will go 6" , TEE piece, then 4", TEE piece, then 5", elbow to the 10" which makes the bottom leg of the chair.

If anyone wants a detailed tutorial on the PVC pipe part, or the cloth backing, LET ME KNOW!

Also, if anyone is not handy with the sewing machine or crafting... this CAN be a CUSTOM ORDER!

July 27, 2012

Kids Saving Money

My young kids (Ages 1 1/2 and almost 3) have never given me any trouble while at the store. When we go to the store, I let them play and look in the toy section with no problem. Sometimes my oldest will ask to take a toy home, but I will simply tell him that we have to leave the toy at the store. I have even had comments on how well they act at the store. WELL, I guess those days are over for me! At least for now until I have conquered this issue!
This past week I actually had to go to the hospital for a few days to get an IV. Luckily I am home now and feeling SOOOO much better, but my mom being the great mom that she is and worrying about her daughter flew into town to help out while I was recovering.

Well... with grandma in town we may or may not have spoiled the kids a bit too much... me included, because how often IS grandma in town!?

My oldest (Bryce) threw a great tantrum yesterday at the store because of a fire truck engine that he wants soooo bad! I am not the sort of mom to give in to things and can see the long run effects of giving in, so of course I was not going to buy a fire truck engine for no reason. I tried telling him to ask for it for his birthday (September), but NO that didn't work.

SO, my bright idea was that he can earn it, and hopefully realize that he cannot buy things everytime we go to the store.

This idea WORKED.

I made up that picture above with all the coins on it and printed it out! He is still so young so doesn't understand money very well, but does understand quarters (that go into candy machines and such).

I put that paper on his dresser with a red sharpie marker and a clear jar.

He has been asking NON stop for ways he can earn money. AND he is actually following through with it all! So far, he has taken out all the small trash bags to the trash can outside, and cleaned up all the millions of animal toys that was left out, and before bed he picked up all the pillows and toys and shoes that was out in our family room. He gets one quarter for each task he completes (unless you are grandma and give him 2 quarters for taking out the trash). He is then given the quarter or 25 cents worth of money and gets to put it in the jar. Then he gets to color in the number of coins he is given. Then he gets to look at all the other coins he has to earn before he can get that fire engine.

I think this will really help him to SEE that things DO actually cost a lot of money! I am also hoping that by the end of this all, that we actually are able to go to the store just like we used to be able to do! CAN'T WAIT!

What are other ways that YOU have fixed this problem????

Stefanie

June 28, 2012

Pink Zebra Baby Shower Invites

Pink Zebra Baby Shower Invites for sale now!
(1) Customize your info and be sent this baby girl pink zebra baby shower invitation, ready to print!
(2) Or make a custom order for me to do all the dirty work for you (Print, Cut, Address, Mail and Send)

$10.00
Pink Zebra Baby Invitations

Hair Tutorial: Half Up Messy Twist

Here is a video for a half up style with a messy twist. Let me know if you guys like it, and what type of hair style you want to see me do next! (Half-Up, All the way up, Down, etc.)
Thanks for Watching!

P.S. I am going to be showing a preview of my 2013 collection of ties, headbands, necklaces, pettiskirts, baby stuff, and lots more very soon! Everyone will have a chance to win a gift card and free stuff! So get ready for that and keep checking back!

Stefanie

June 25, 2012

Hair Tutorial: Scrunched Hair

HAHA - Don't you LOVE the picture that You Tube stops the video on?

Check out this video on how to scrunch your hair and give it a wavy/curly look!


Check out this additional video on how to scrunch your hair using a diffuser... (for added scrunch and waviness if you need more)

April 9, 2012

No Water Mess Bubbles

This is so fun to do! Let your kids play in bubbles without all the watery mess or bubble solution mess! Simply follow the directions below and blow into the top where you normally drink from. A long snake bubble will begin to appear. Continue to blow and make it as long as you can, or shake it off and let your kids play with it! Put it on your face to make beards or stomp on it on the ground! Preparing it once will last more than one blow too! DO NOT breathe in the air because it WILL make bubbles that come toward your mouth!


Supplies needed:
One empty water bottle with cap off (Cut off the bottom)
2 rubber bands (to hold the washcloth on)
1 washcloth (to cover the cut off end and held with rubber bands)
small amount of water
small amount of dish soap

Directions:
Cut off the bottom of the empty water bottle and place the washrag on the cut off end. Secure with 2 rubberbands. Dip the end with washcloth in water or just soake the wash cloth in water. Put dish soap on the wash rag and use your fingers to spread it around the cloth. This will last a good while before you have to get more soap or water on it!


April 5, 2012

Magnetic Learning and Travel Games

So, I had an idea for something to keep my kids entertained in the car as we travel, that would not be messy! Here is what I came up with....

I just made a shape sorter and race track to see if this would work... but really you can do anything! The kids can learn this way, or just have fun!
The possiblities are endless!

Supplies:
Cut outs of shapes, animals, or whatever else you want (I just printed mine out then cute)
Self-Laminating sheets (to laminate the small pieces)
Small craft magnets for the back of the items
Stove Top burner covers (magnets will stick to these)
Either printed paper & mod podge, or printable magnetic paper for the background (I originally tried the magnetic paper, thinking I could just swap out the background and keep the same stove top burner cover. This DOES work, but I discovered the stove top covers stack sooo well, so it is your choice!)


They stack so well... it won't take up any more room than one, but you can actually have lots!

Look online for ideas... you can use similar ideas as a file folder game... but these seemed to me easier as well as less messy since they magnetize very well!

February 25, 2012

Handmade Ornaments

What a fun thing to do with your kids! This year I made handmade ornaments with my kids! They are still very young, but we tried! Use cookie cutters or even smash your kids hands into them! Mix the flour, salt and water, shape and bake! That's it!


Here is a recipe to use....

4 Cups Flour
1 Cup Salt
1 1/2 cups warm water

(Makes about 15 ornaments, depending on the size)

Mix and spread out on floured surface about 1/8" thick or however thick you want! Use a toothpick, or a straw (what I used) to make holes for yarn to hang onto the tree!

Bake at 325 degrees until hard. (About 1 hour)

Keep it as is, paint it, decorate it however you want!

Hair Tutorial: Round the Barrel Curls

Here is a quick tutorial on curling your hair with your curling iron WITHOUT clamping. It is the way to go, if you didn't already know!

February 17, 2012

Make-up tutorial: dark color blend

Just a way of using several dark colors to bring them together! Let me know what you think and if you want to see more!

Haha - Don't love it that you can't change the picture it stops at. Awe funny faces when putting on make-up!


(My friend Rachel suggested I start a make-up tutorial video - since I haven't yet - hope it turns out well!)

Stefy

February 10, 2012

Valentines Discount Code

Hey Everyone, so I have been super busy STILL with unpacking into our new house. I am not done yet, but at least I am FINALLY starting to put items up for sale. I only have one item up now, but should have more soon! Better one than none!

Here is a coupon code good through the month of FEBRUARY to celebrate me starting to actually sell the products I make!

LOVE1

Use this code in my etsy shop for a 15% off discount. Currently that means there is only one item... neckties for boys through men. However, I will also let you use this discount for custom products... meaning you pick the fabric and size, I make the necktie! Go for a valentine's tie, or an everyday or church tie, or even a necktie with a favorite movie character! I am so excited to be finally starting this up!

Currently the neckties are going for $18. With this promotion, only good through February, the neckties will be $15.30 each! Hurry and get some before the promotion ends!

Stefanie

New Product: Boys & Men's Tie

This tie comes in many sizes. Please specify when ordering.
$18
Click Here to purchase.
These ties are also available for a custom order. Please fill out the custom order form using the tabs above and specify fabric of choice and size.
Sizes:
Lil Boy Tie - Age 2-4: 40" Length, 2.75" Width
Lil Kid tie - Age 4-8: 48" Length, 3" Width
Lil Man Tie - Age 8-12: 48" Length, 3.25" Width
Men's Tie - Adult - 59" Length, 3.25" Width

Boy's & Men's TieBoy's & Men's Tie

Boy's & Men's Tie

February 9, 2012

Hair Tutorial: Half-Up Bump

Just a way to have a half-up hair style and give it some bump, no need to tease, but of course you can if you want.